This article discusses the development of a python Graphical User Interface that runs a PSIM simulation in two stages.
If you have not experimented with python on PSIM applications before, you should read the relative article here.
Furthermore, this is only applicable with PSIM v2025.1 or later. If you have not installed it yet, you can download it from here.
PSIM application
Our project involved a boost power factor corrector, and we aimed to implement a two-stage simulation featuring distinct timesteps and simulation durations for each stage. To learn more about two-stage simulation techniques, you can watch the following video.
The schematic file is shown below, but do not forget that the GUI can be implemented on every PSIM simulation.
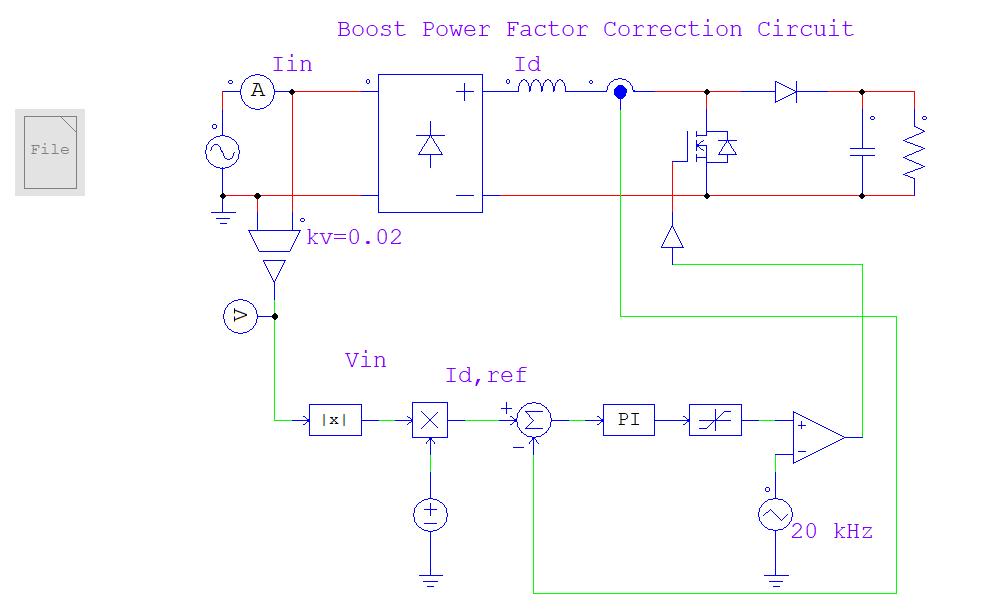
The only requirement to maintain compatibility with the exact GUI is to ensure that the timestep and total simulation time variables are named as follows:
Ttotal1Ttotal2, Tstep1, and Tstep2.
These variables must be included in the parameter file, along with any other variables needed for your application. Additionally, make sure the parameter file is disabled in the PSIM schematic file, otherwise the parameters you define cannot be edited.
Python GUI development
The python GUI can be written in every code environment, like Altair Compose or VScode.
The GUI code consists of four main functionalities
- PSIM schematic and parameter files selection
pythonCopyEditschematic_path = filedialog.askopenfilename(...)
def read_params_from_file(file_path)
Parameters are displayed in editable tk.Entry widgets.
- Two - stage simulation execution
Stage 1 (only if .ssf doesn’t exist):
Runs the first simulation with:
SaveFlag = 1, LoadFlag = 0
Stage 2:
Loads the .ssf file and continues simulation with:
SaveFlag = 1, LoadFlag = 0
Simulations are executed via:
pythonCopyEditpsim.PsimSimulate(schematic_path, output_file, **params)
- Error Handling
The GUI handles missing files, invalid parameters, and API errors using:
messagebox.showerror("Error", ...)
- Output files
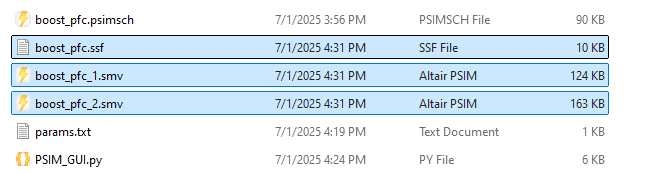
Stage 1 waveform: filename_1.smv
Stage 2 waveform: filename_2.smv
Intermediate state: filename.ssf
Libraries used
- tkinter (GUI)
- psimapipy (PSIM Python API)
Python GUI run process
The run process of the python GUI has the following steps as well:
First, run the attached pythonGUI.py file. A window will appear prompting you to select the .psimsch schematic file and the .txt parameter file.
After importing the files, all the parameters included in the parameter file will automatically appear in the following format:
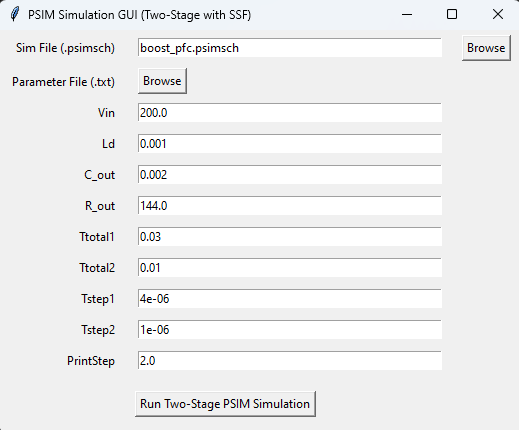
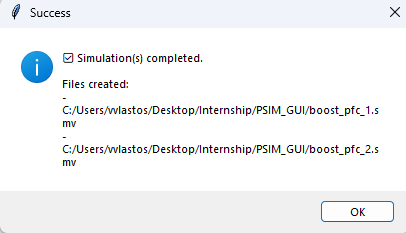
Of course, each parameter value can be edited by the user. Once you're done, click the "Run Two-Stage PSIM Simulation" button. A message will pop up confirming that both simulations have been completed successfully, and the corresponding .smv files will be generated in the same folder as the PSIM schematic.
Uploaded files: