In Weld Certification, when dealing with multiple weld lines that require different weld parameters, it is necessary to define each weld parameter separately in the Points tool. To save setup time, we can create a weld template file (.xml) to streamline this process. By using a weld template file (.xml), the default parameters displayed in the Points tool—such as Evaluation Distance, General, and Location Properties—can be automatically updated.
Elaborate information and examples about weld templates can be found in Hyperlife’s Weld Certification Documentation: Weld Templates
1. Weld Template Format
The weld template consists of three main blocks corresponding to the 3 tables in the Points Tool:

Each weld template based on the regulation and evaluation method is defined by three tables within the <WeldData> root tag, as shown above.
The weld template .xml should be contained within the <WeldPropertyTemplateData> root tag, as shown below. The tag has one attribute: version.

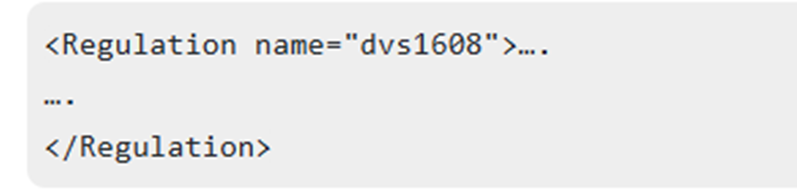
The weld template should hold at least one <Regulation> root tag, as shown below.
Supported Regulation can be found in Hyperlife’s Documentation: Supported Regulations.
! Parameters for multiple regulation templates can be saved to a single weld template .xml.
The valid attributes for each table are listed in Hyperlife’s Documentation: Table Attributes.
2. Weld Template Example
As an example, we will create a Template for DVS1612 regulation and Butt weld.
1) After we detect the Weld lines in our model and select the Regulation in Weld Specification Template we move forward to the Points Tool.
2) In the Points Tool we define the Evaluation Distance, The General Table and the Location Table for one Butt weld:

3) Then, we can export these parameters by clicking the Export Weld Property File arrow, in an .xml file.

! Where to save:
The weld templates are sourced into the HyperLife Weld Certification session via the Weld Template folder. The default location defined in Preferences is:
C:/Users/<user id>/Documents/Fatigue/WeldTemplates.
4) Corresponding parameters between the .xml file and Evaluation Points:

5) We will edit the exported .xml file, which corresponds to a specific weld, according to the format described above (Weld Template Format).
In the .xml we will keep the Table contents corresponding to the weld parameters and replace the root tags as shown below:

6) Now, we can apply the .xml file under Weld template Specification Tool:
Apply Weld Templates in Specifications Tool:
- Select the Regulation.
- Click to show weld templates.
- Select the weld category for the required type.
The template names for the weld type are listed from the weld template .xml saved in the Weld template directory.
- Select an Evaluation Method and click Apply.
The default parameters we specified in the .xml are applied to all weld line evaluation points according to the selected specification.

Weld categories can be changed for each weld under Weld Category in the Points Tool: