This article outlines the steps and considerations for setting up a graphmart that is updated regularly using GraphStudio’s REST APIs. This approach allows us to automate graphmart configuration, dataset onboarding, and executing SQARQL queries.
Workflow Overview
The typical API-based workflow includes the following steps:
- Creating a Graphmart
- Add a Layer
- Upload Dataset and Ontology
- Add Load Dataset Step
- Activate the Graphmart
- Query the Graphmart via SPARQL endpoint
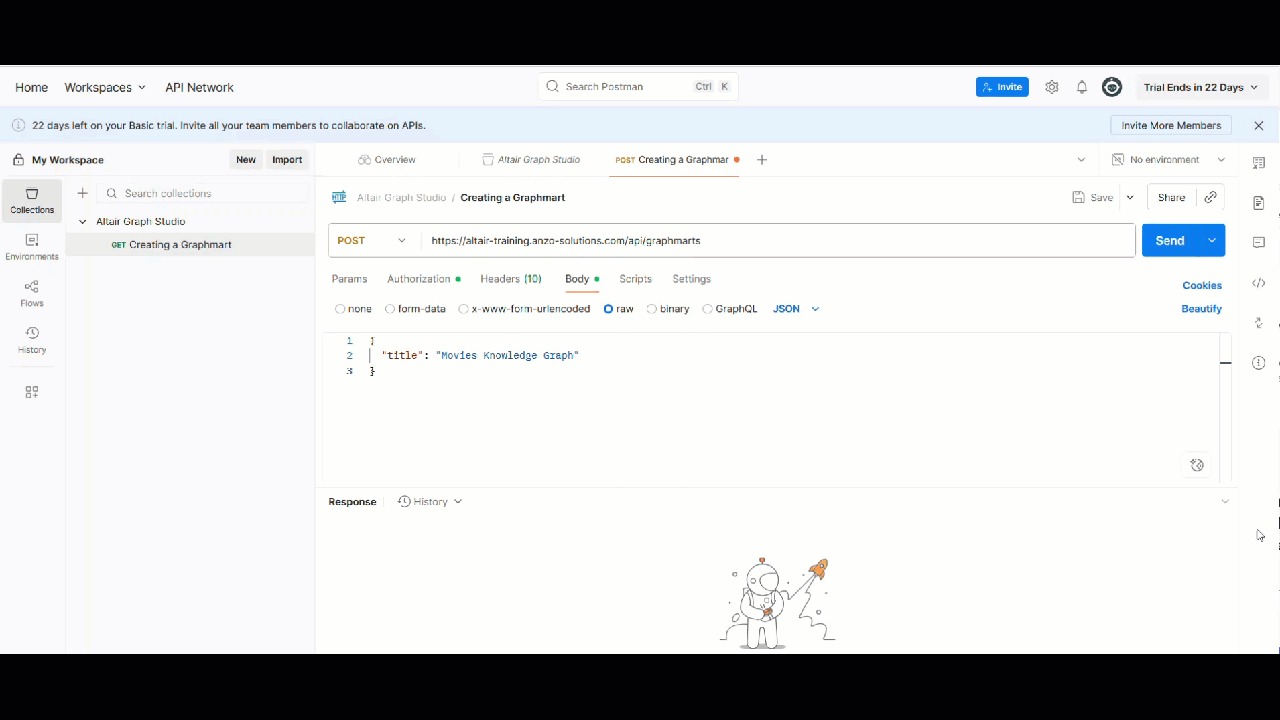
1. Creating a Graphmart
To create a new graphmart programmatically, use the POST/graphmarts endpoint.
- API:
POST https://<hostname>/api/graphmarts
This request will create and configure a graphmart in GraphStudio. For a full list of the endpoint’s configurations, refer to the documentation:
https://docs.cambridgesemantics.com/anzo/v5.4/api/#/graphmarts/createGraphmart
Payload Example
{

  "title": "Movies Knowledge Graph",

  "description": "Graphmart for movies, actors, directors, and abstracts",

  "tags": ["movies", "actors", "directors", "abstracts"],

  "active": false,

  "manualRefresh": true,

   "loadPriority": 50,

  "ignoreErrors": true,

  "requireES": false

}
While title is the only mandatory field, specifying properties likemanualRefresh,loadPriority, and ignoreErrors can help optimize activation and loading behavior for production environments.
Creating a Graphmart using API
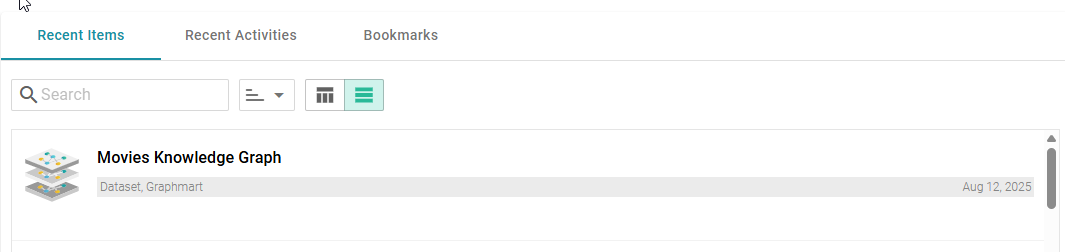
We can observe on Graph Studio that the above Graphmart is visible under the Recent Items tab.
Created Graphmart
Note:Screenshot from Graph Studio v5.4; UI may differ slightly in v2025.
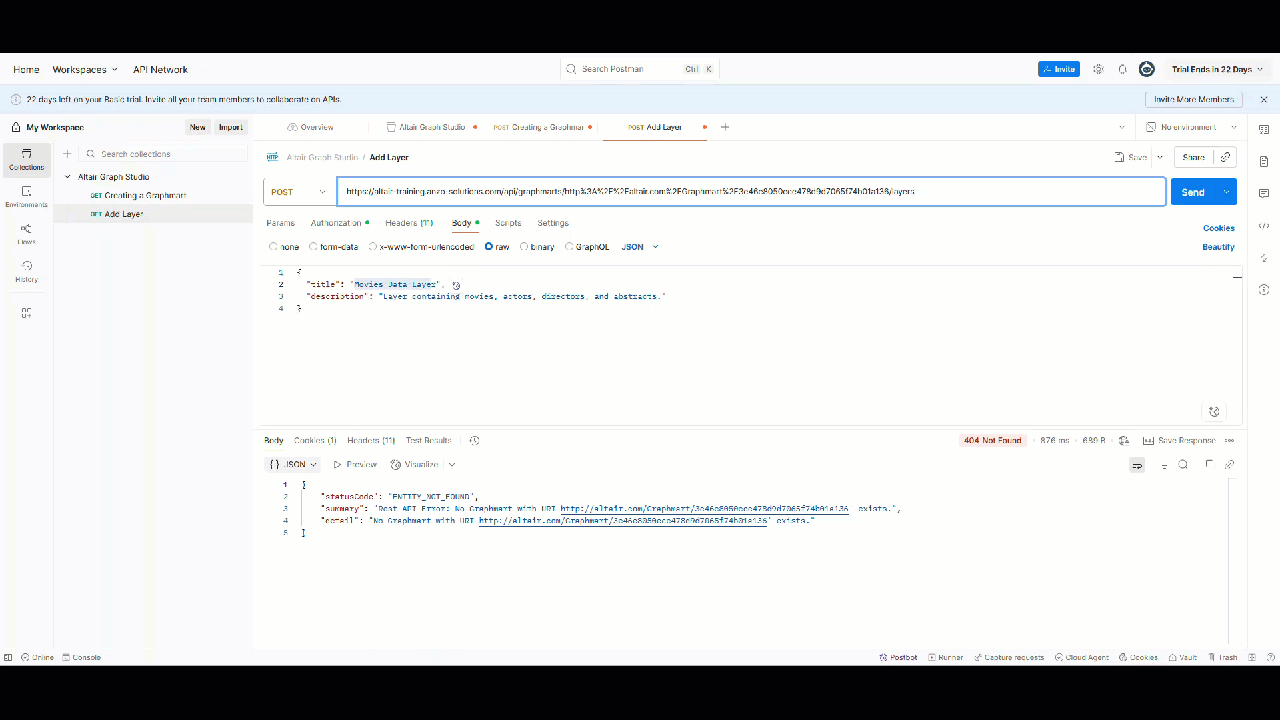
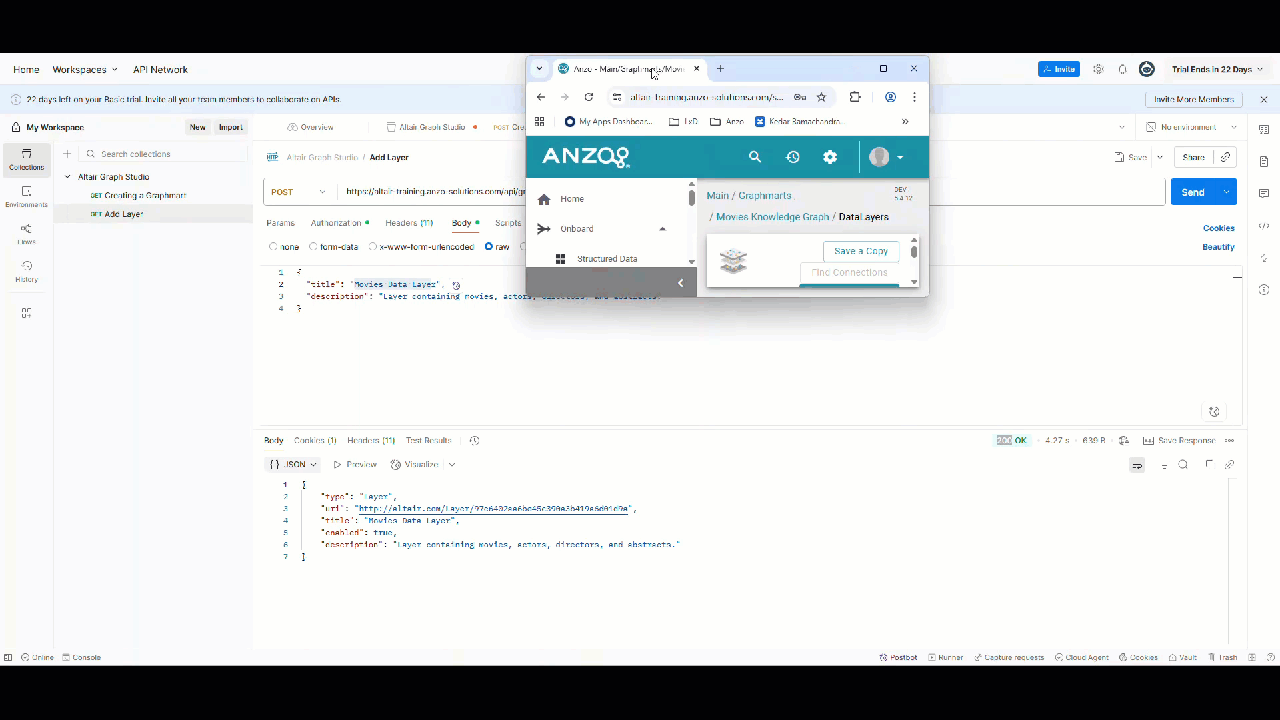
2. Add a Layer
Layers organize a graphmart into logical components, typically representing specific data domains. Within each layer, you can define load steps that ingest or transform data before it is made available in GraphStudio.
To add a layer, use the POST/graphmarts/{graphmart_uri}/layers endpoint.
- API:
POST https://<hostname>/api/graphmarts/{graphmartId}/layers
Payload Example
{

  "title": "Movies Data Layer",

  "description": "Layer containing movies, actors, directors, and abstracts.",

  "enabled": true,

  "autoDeployOntologyChanges": true

}
The title field is the only required parameter, but additional properties allow you to configure Elasticsearch integration, indexing behavior, incremental data handling, and automatic ontology updates. These additional configurations can be seen at:
https://docs.cambridgesemantics.com/anzo/v5.4/api/#/graphmarts/createGraphmartLayer
URI of the Graphmart
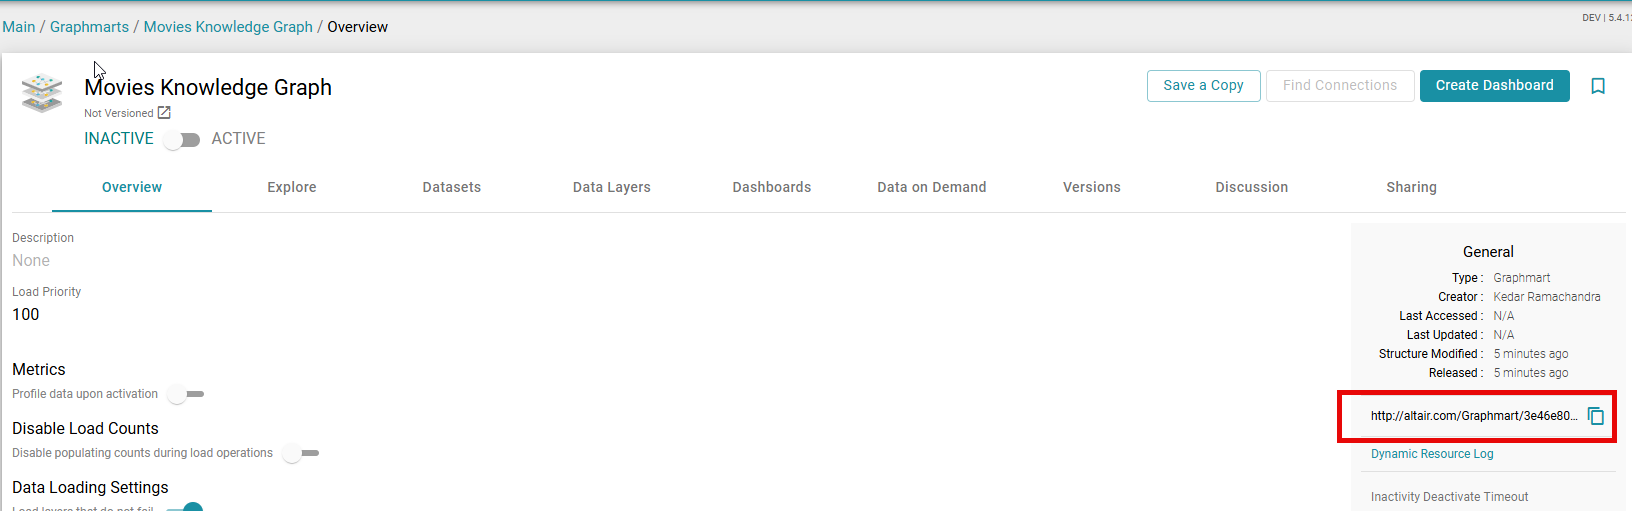
Note: Screenshot from Graph Studio v5.4; UI may differ slightly in v2025.
Creating a Layer
Created Layer
Note: Screenshot from Graph Studio v5.4; UI may differ slightly in v2025.
3. Upload Dataset and Ontology
This step uploads a dataset from an accessible location onto the GraphStudio Dataset Catalog.
Since direct CSV uploads are not supported, datasets must be in RDF format. Prepare your RDF files ahead of time and upload them to a location accessible to GraphStudio. GraphStudio also has certain requirements that the file should follow:
https://docs.cambridgesemantics.com/anzo/v5.4/userdoc/dataset-rdf.htm#file-requirements
Assuming the dataset is saved as an RDF Zip, you can upload the dataset using:
- API:
POST https://<hostname>/api/datasets/from-RDF-Zip - Payload: Upload your RDF zip file as
form-data
Note: When using Postman, you may want to check the following configurations to ensure 200 OK
key | Type | Example |
|---|
rdfZip | File | Upload the rdf file |
fileConnection | Text | Enter the URL of your shared NFS Storage |
title | Text | Add a title to your dataset |
filePath | Text | Give this a path/folder name of your choice |
Uploaded Dataset visible on the shared NFS folder
Note:Screenshot from Graph Studio v5.4; UI may differ slightly in v2025.
You can then upload the associated ontology file using:
- API:
POST https://<hostname>/api/models/upload - Payload: Upload your ontology file as
form-data
Uploading Ontology
Ensure that you note the Dataset URI from the API response. We will use this to fetch further details of the Dataset and the catalog entry in the next step.
4. Add Load Dataset Step
The loadDatasetStep loads a system dataset or a dataset from the Dataset Catalog into the layer. This step supports various configuration parameters such as:
- title – name of the step
- source – source data to act upon
- type – "LoadDatasetStep"
- gmLinkedDataset – URI of the Linked Dataset Catalog Entry
For the complete schema and available options, see the API docs:
https://docs.cambridgesemantics.com/anzo/v5.4/api/#/schemas/loadDatasetStep
The dataset can be connected to your graphmart layer using the POST/layers/{layerId}/steps endpoint.
- API:
POST https://<hostname>/api/layers/{layerId}/steps
Payload Example
{

  "source": "http://<hostname>/ontologies/Graphmarts#Self",

  "title": "Load Movies Dataset",

  "type": "LoadDatasetStep",

  "gmLinkedDataset": "http://<hostname>/linked-dataset/movies",

  "enabled": true,

  "ignoreLoadErrors": false,

  "incrementalData": {

    "enabled": true

  }

}{

  "title": "Movies Data Layer",

  "description": "Layer containing movies, actors, directors, and abstracts.",

  "enabled": true,

  "autoDeployOntologyChanges": true

}
While only title, source, type, gmLinkedDataset are mandatory, specifying properties such as enabled, autoDeployOntologyChanges, and enableElasticsearchIndex can help align layer behavior with your data processing and search requirements.
Steps to get gmLinkedDataset
gmLinkedDataset requires the Catalog Entry of the Dataset we have uploaded in the earlier step.
Using the Dataset URI, we will send a GET request and expanding the catalogEntry
- API:
POST https://<hostname>/api/datasets/{datset-uri} - Ensure that you add the Expand
catalogEntry in the Query Parameters
Get Dataset Details
The catalogEntry is the gmLinkedDataset that we will use in the body of the Load Datastep API.
5. Activate the Graphmart
After creating the Graphmart , adding layers, and defining load steps, you can activate it. Activation triggers the configured load and transformation steps, making the data queryable.
Use the POST/graphmarts/{graphmart_uri}/activate endpoint to activate.
- API:
POST https://<hostname>/api/graphmarts/{graphmartId}/activate - We will need to add a
staticAzgServer URI from our configuration to the body.
This operation may take time, depending on dataset size and complexity. Activation status can be checked using /graphmarts/{graphmart_uri} or the layer/step-specific status endpoints.
6. Query the Graphmart via SPARQL endpoint
Once activated, the Graphmart is accessible via its SPARQL endpoint:
https://<hostname>/sparql/graphmart/{graphmart_id}
- Send SPARQL queries using your preferred client (e.g., GraphStudio’s SPARQL editor, Python’s
SPARQLWrapper, Postman.
Sample Queries
Movies Leonardo DiCaprio acted in:
SELECT ?movieTitle

WHERE {

?movie a :Movie ;

:title ?movieTitle ;

:hasActor ?actor .

?actor :name "Leonardo DiCaprio" .

}
Director of “Inception”:
SELECT ?directorName

WHERE {

  ?movie a :Movie ;

         :title "Inception" ;

         :hasDirector ?director .

  ?director :name ?directorName .

}
Abstract of “Inception”:
SELECT ?abstract

WHERE {

  ?movie a :Movie ;

         :title "Inception" ;

         :abstract ?abstract .

}
For more examples, refer to the documentation:
https://docs.cambridgesemantics.com/anzo/archive/v4.4/userdoc/sparql-endpoint.htm
7. Troubleshooting and Debugging
If activation or load steps fail:
- Check status - use the following endpoints to get the status of a graphmart, layer, or step:
GET/graphmarts/{graphmart_uri}/statusGET/layers/{layer_uri}/statusGET/steps/{step_uri}/status
- Review error messages – Errors are usually returned in the
statusMessage or details field. - Adjust payloads/configurations – Common fixes include correcting dataset URIs, fixing ontology links, or enabling
ignoreLoadErrors in a load step for non-critical errors.
8. Tools & Automation
Once you are comfortable making direct API calls to create graphmarts, the next step is to integrate these calls into your organization’s automation workflows. GraphStudio APIs are designed for flexibility, making it possible to orchestrate graphmart creation with a wide range of tools.
Postman is ideal for crafting and testing graphmart creation requests. You can parameterize values (such as dataset IDs, schema names, or configuration options), save them in collections, and rerun them as needed. Postman’s Collection Runner or Newman CLI lets you schedule or chain graphmart creation requests without writing extra code.
- Python (and other scripting languages)
For repeatable data onboarding, scripting provides more control. Using Python’s requests library, you can build scripts that not only create graphmarts but also handle sequencing (e.g. uploading datasets, creating data layers, building the graphmart). These scripts can implement error handling, retries, and even logging so that the process fits into production-grade data pipelines.
- Orchestration and Enterprise Integration
Graphmart creation often needs to be part of a larger workflow that includes data ingestion, transformation, and quality checks. API calls to create graphmarts can be embedded into your existing orchestration platforms:
- Airflow – Add GraphStudio API tasks into DAGs so graphmarts are created as soon as new data is processed.
- Jenkins – Use Jenkins pipelines to automate graphmart provisioning as part of a CI/CD flow for data products.
- Kafka / Event Streams – Trigger graphmart creation automatically when new data lands in your environment.
- Custom Job Runners – Wrap the API requests into your internal scheduling or automation framework to align with enterprise standards.
Because graphmart creation is exposed through HTTP/S endpoints, it can be automated with almost any tool your organization already uses. This means you can design repeatable, scalable data onboarding and graphmart provisioning pipelines without introducing new technologies.
References
