Creating adhesive brick elements

Endeavor
Endeavor Altair Community Member
edited May 2021 in Community Q&A

Hello,


I need a help with procedure please.?


I am able to create the adhesive brick elements mesh using optistruct (3D - connectors - area - 'constant thickness' as Hexathickness - type 'adhesives' ) in student version (Hypermesh 2019) (as in the image).
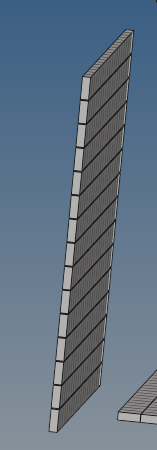
 

image.png.7bbf53ab12a5b7a33a45d33fab30fa8c.png


But in Radioss ( Block format 140) (Hypermesh 2017.2), the same process is not working.  While using the same procedure, I get the surface connector (as below) without thickness (even while creating through: 3D - connectors - area - 'adhesive(contact)' as type). But I would like to create the brick elements.
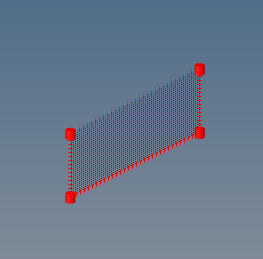
 

image.png.ba05685a0f4aa551a4ac2b3776cd6437.png


Also, I would like to do hexa positioning it with 'mid thickness' option and I couldn't change the 'shell gap' option to the 'mid thickness' with the drop down (as shown in the highlighted below).


<?xml version="1.0" encoding="UTF-8"?>image.thumb.png.451f14846244edcdcc3abb429b29fe00.png


Could anyone please tell me if it is possible and also how to create it in the Radioss.?


Thanks in advance!

Tagged:

Answers

  • Simon Križnik
    Simon Križnik Altair Community Member
    edited January 2020

    Hi,


    I am able to create an area connector of type adhesive (contact) in Radioss (Hyperworks 2019.1 in Block format 140 user profile). The red rectangle indicates the connector realization failed for some reason (usually due to inappropriate tolerance).

    <?xml version="1.0" encoding="UTF-8"?>Radioss_adhesive.gif

  • Endeavor
    Endeavor Altair Community Member
    edited January 2020

    Thanks for the tutorial. :)/emoticons/default_smile.png' srcset='/emoticons/smile@2x.png 2x' title=':)' width='20' /> It was helpful.


    Would it be possible to create the same if the upper and lower plate shell elements are of different size(like elem size in upper plate = 20mm and in lower plate = 6mm? Because when I try, the connector is realized at one plate and not in the other plate.

  • Simon Križnik
    Simon Križnik Altair Community Member
    edited January 2020

    Glad to help.


    Actually, location: elements have to be selected only on one side. The connection of adhesive brick elements is done through type 2 tied contact and is able to connect elements with different mesh sizes. 

  • Endeavor
    Endeavor Altair Community Member
    edited January 2020

    Could you please share some pdfs or give me the procedure on how to connect using the type 2 tie contact?

  • Simon Križnik
    Simon Križnik Altair Community Member
    edited January 2020

    Tied contacts are created automatically (along with materials, properties,...) when creating connectors with post script (see the end of the previously shared tutorial).


    Type 2 tied contact:


    b86e7df56b4e3691d3c7698f380bd9ad386b128f.jpg?image_play_button_size=2x&image_crop_resized=960x540&image_play_button=1&image_play_button_color=7b796ae0

    VII_b_Interface Type 2 in RADIOSS - Altair University

  • Endeavor
    Endeavor Altair Community Member
    edited February 2020

    Thanks for the information and the tutorial :)/emoticons/default_smile.png' srcset='/emoticons/smile@2x.png 2x' title=':)' width='20' />

  • Rielson Falck
    Rielson Falck New Altair Community Member
    edited May 2021

    Hi,


    I am able to create an area connector of type adhesive (contact) in Radioss (Hyperworks 2019.1 in Block format 140 user profile). The red rectangle indicates the connector realization failed for some reason (usually due to inappropriate tolerance).

    <?xml version="1.0" encoding="UTF-8"?>Radioss_adhesive.gif

    Hi Simon? I would be very happy if you couls send the *.hm file or *.fem file. Thank you very much